

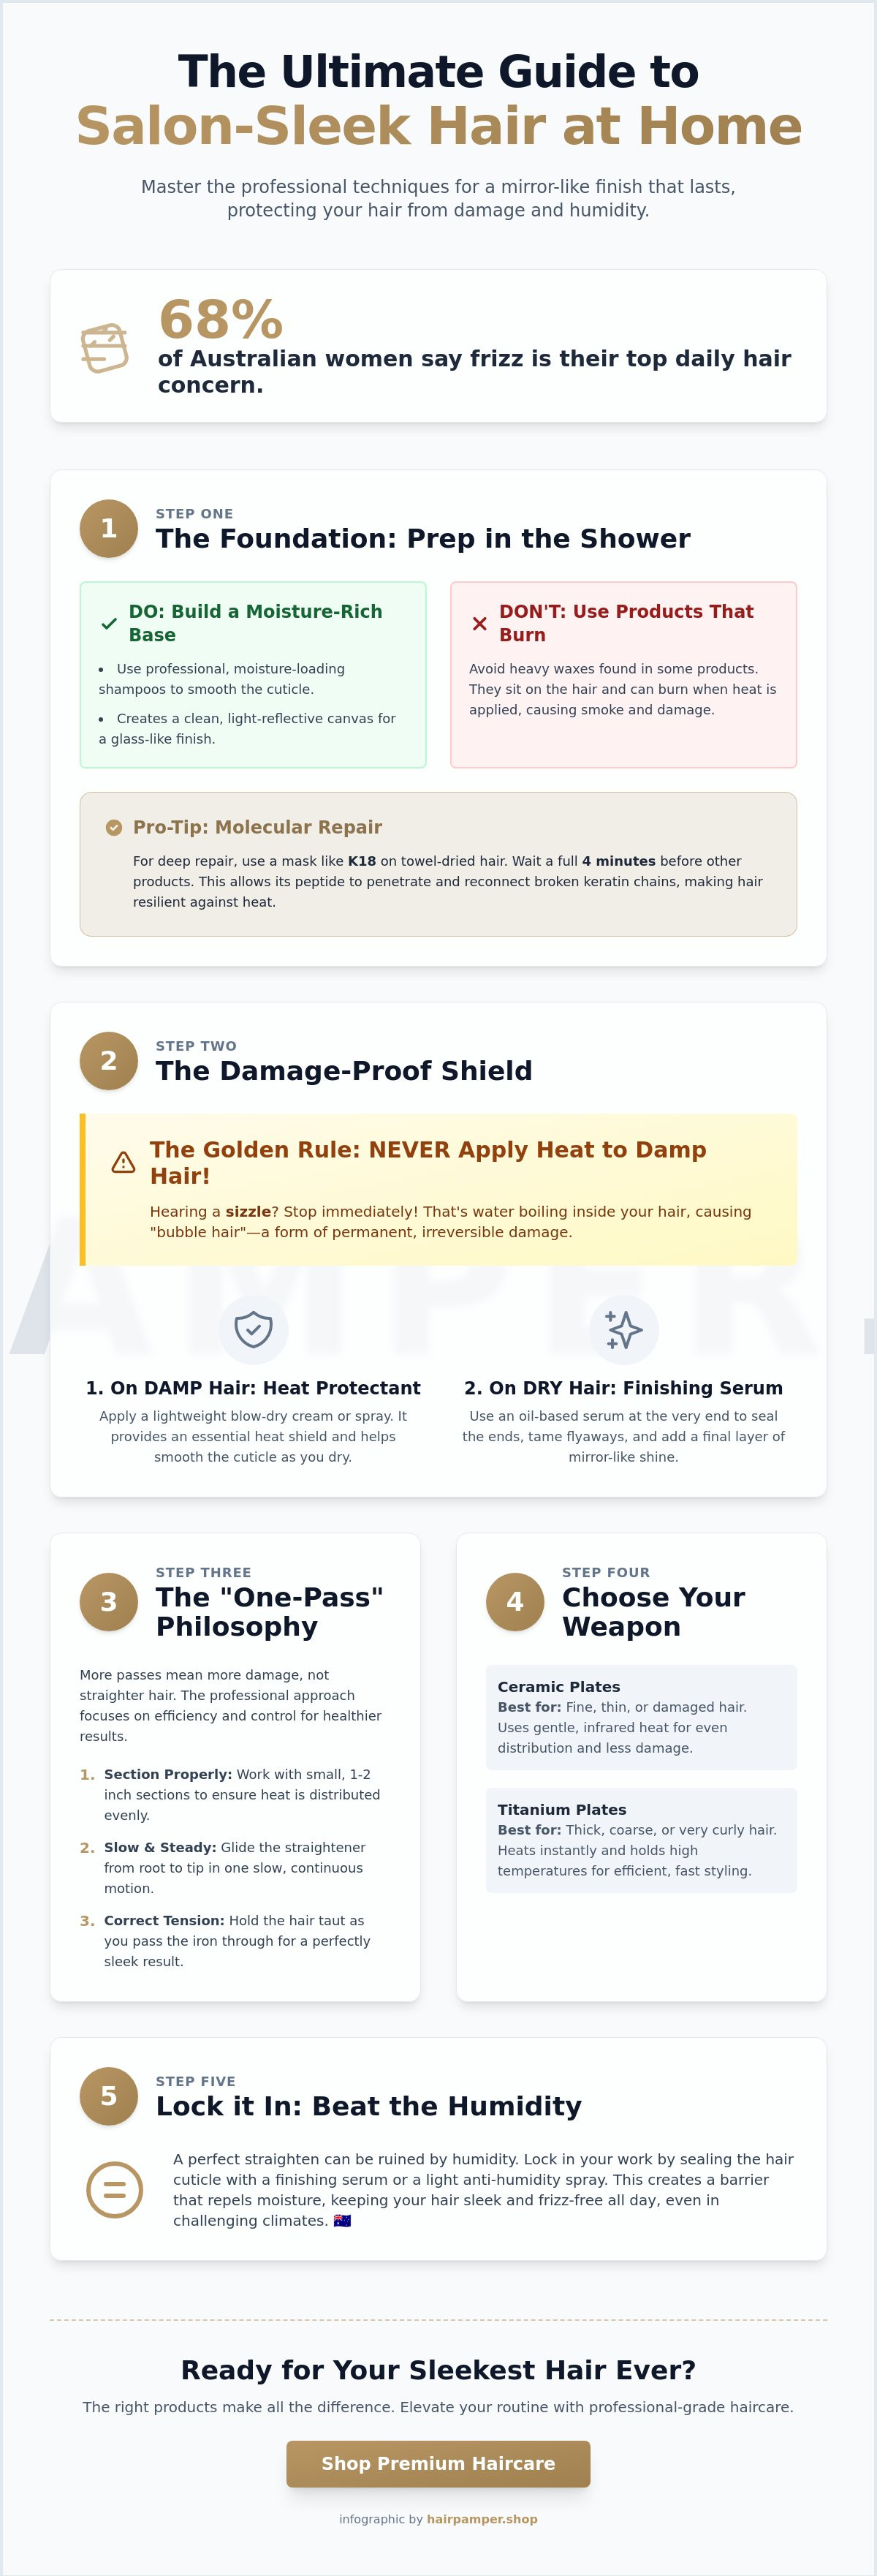
What if you could skip the expensive salon appointment and still rock a mirror-like finish that survives a humid afternoon in Brisbane? ✨ It’s a dream we all share! A 2023 beauty industry survey revealed that 68% of Australian women struggle with frizz as their top daily hair concern. We know the frustration when you spend 45 minutes styling, only for your hair to feel like dry straw or puff up the second you leave the house. You deserve a look that stays sleek without the constant worry of heat damage or wasted morning time. 💖
This guide is your ultimate shortcut to mastering the art of hair straightening hair with professional techniques and premium products that nourish every strand. 💁♀️ I promise you’ll learn how to achieve that glossy, healthy-looking finish that lasts until your next wash. We’re diving into the exact steps to speed up your routine and keep your hair looking effortlessly polished. Let’s get you that salon-quality glow-up right in your own bathroom! 🎀
Key Takeaways
- ✨ Start your journey to perfection in the shower by choosing professional, moisture-loading shampoos that smooth your cuticles before the heat even touches them!
- 💖 Master the "Golden Rule" of styling and discover why the right thermal protection is your absolute best friend for achieving that coveted mirror-like shine.
- 💇♀️ Learn the professional "one-pass" philosophy and sectioning secrets that make hair straightening hair at home feel like a luxury salon experience!
- 🇦🇺 Say goodbye to frizz with our expert tips on beating the Australian humidity and keeping your sleek look locked in from morning to night!
- 🛠️ Find your perfect match by understanding the difference between ceramic and titanium plates to ensure your hair stays healthy, radiant, and damage-free.
The Foundation of Sleekness: Why Hair Straightening Hair Starts in the Shower
Ever wondered why your DIY blowout never quite matches the salon? The secret isn't just the stylist's expensive iron. It's the shower routine! Real hair straightening hair results begin with intense moisture-loading, not just high temperatures. Most people focus on the heat, but the magic happens when you prep the cuticle to lie flat before the tool even touches your strands. ✨
While various hair straightening techniques have evolved over the decades, the science of the hair cuticle remains the most important factor. Clean hair is a basic requirement, but "prepped" hair is what gives you that glass-like finish. Professional-grade shampoos work by smoothing the hair's outer layer early in the process. This reduces friction and prevents the "poof" that often happens as soon as you step outside into the Australian humidity. 🇦🇺
To better understand this concept, watch this helpful video:
The Role of Repair Masks and Molecular Bonds
Regular heat styling can take a toll on your hair's internal structure. If you're committed to the hair straightening hair lifestyle, K18 is a non-negotiable part of your kit. Unlike traditional conditioners that just coat the surface, K18 travels deeper. You should apply the K18 Leave-In Molecular Repair Hair Mask to towel-dried hair and wait four minutes before adding any other styling products. This short pause allows the bioactive peptide to work its wonders. Molecular repair works by reconnecting broken keratin chains at the innermost level, ensuring your hair stays resilient even under intense thermal stress. It's the ultimate insurance policy for your locks! 💖
Hydration vs. Heaviness: Choosing Your Base
The goal is a selymes, flowing finish, not a greasy one. Choosing a repair-focused shampoo is the first step toward that dream. The Oribe Gold Lust Repair & Restore Shampoo is a cult favourite for a reason. It balances the scalp while using bio-restorative complexes to strengthen each strand from the inside out. 🌟
You'll want to avoid heavy, low-quality waxes often found in drugstore brands. These ingredients don't absorb; they just sit on top of the hair. When you run a hot iron over them, they cause that scary "smoke" you might have seen. That isn't steam from moisture; it's literally product buildup burning off your hair. By using a high-end base like Oribe, you ensure a clean canvas that reflects light instead of trapping heat. It sets the stage for a smooth, ragyogó finish that lasts for days. 💁♀️
Pre-Straightening Prep: The Secret to Mirror-Like Shine
You wouldn't start a painting on a rough, dirty canvas, and your hair is no different. The foundation you build before the iron even touches your strands determines whether you'll get a glassy finish or a frizzy mess. Following the "Golden Rule" is non-negotiable: never apply heat to damp hair. If you hear a sizzle, stop immediately. That sound is the water inside your hair shaft boiling, which creates "bubble hair," a form of permanent structural damage that no mask can fix. 🛑
Thermal protection is the most vital step in your hair straightening hair routine. It acts as a physical barrier, slowing down the conduction of heat and ensuring it's distributed evenly. While we focus on protecting against heat, safety goes beyond just temperature. It's also about what's in your products. Many traditional salon smoothing treatments have been linked to the health risks of formaldehyde, which is why choosing high-quality, clean thermal protectors for home use is a much safer way to achieve that sleek look. 🛡️
Layering products is an art form. To avoid the dreaded greasy look, start with a lightweight blow-dry cream on damp hair. This provides the internal structure and initial heat shield. Save your finishing serum for the very end. The main difference? A blow-dry cream is designed to work with heat to smooth the cuticle, while a serum is an oil-based polisher meant to seal the ends and add shine once the hair is cool. If you're looking for the perfect prep kit, you can find professional styling essentials here to get started. ✨
The Essential Thermal Protection Checklist
Your protector needs to work as hard as your flat iron does. Look for advanced copolymers and proteins that shield the hair up to 230 degrees, the standard maximum for professional tools in Australia. We love Davroe and O&M because they deliver lightweight, effective protection without the sticky residue. For those who prefer plant-based beauty, Discover Davroe and their range of natural protection options that keep your hair healthy and bouncy. 🌱
Blow-Drying for Success
The secret to a 10-minute hair straightening hair session is a 20-minute blow-dry. Use a directional nozzle on your dryer and always point it downwards from roots to ends. This physical action flattens the hair cuticle, which is the only way to achieve a mirror-like reflection. 🧴
- The Rough Dry: Use your fingers to shake out 80% of the moisture. This saves time and prevents arm fatigue.
- The Smooth Dry: Use a round or paddle brush to create tension for the final 20%. This "pre-straightens" the hair.
- The 100% Rule: Your hair must be bone-dry. Even 1% moisture will cause the hair to "poof" the moment you walk into the Aussie humidity. ☀️
By taking these extra ten minutes to prep, you aren't just styling; you're protecting your investment. A smooth blow-dry means you'll need fewer passes with the flat iron, resulting in less heat stress and more shine over time.
Step-by-Step: How to Straighten Hair Like a Professional Stylist
Ready to ditch the frizz and embrace that mirror-like shine? 🌟 Achieving salon-sleek results at home isn't about luck; it's about mastering the technique. Most people make the mistake of rushing through the process. A professional stylist knows that patience is the secret ingredient for hair straightening hair that stays perfect until your next wash! Let's transform your bathroom into a private hair sanctuary. ✨
Mastering the Sectioning Technique
Do you usually just grab random chunks of hair? It's time for a change! Professional results start with a clean canvas. Divide your hair into four manageable quadrants. Use professional clips to secure the top sections. Always start at the nape of your neck and work your way up to the crown. 💁🏼♀️
- Bottom-up approach: Starting at the back ensures you don't miss hidden waves.
- Small sections: Keep your sections about 2 centimetres wide.
- Consistency: Small sections allow the heat to distribute evenly, meaning you won't need to repeat the movement.
Working in small, deliberate sections actually saves time. It prevents the frustration of finding a wavy patch in the middle of your sleek look later! 💖
The One-Pass Rule and Iron Movement
Stop the "clamp and flick" habit! 🛑 The "One-Pass" philosophy is your hair's best friend. Instead of running the iron over the same spot five times, move it once, slowly and steadily. This reduces heat fatigue and keeps your strands healthy. When you reach the ends, slightly tilt the iron inward. This creates a soft, natural fall rather than a stiff, "poker-straight" look that can feel dated.
Safety is just as important as style. Before you try any heavy-duty chemical smoothing at home, read this FDA information on hair straightening safety to stay informed about ingredient risks. We want your hair to be beautiful and safe! 🌿
To get that ultra-glossy finish, use the "comb-chase" method by gliding a fine-tooth comb through the hair just millimetres ahead of your flat iron. This ensures every single hair is perfectly aligned before the heat touches it. The result? A frizz-free, glass-hair finish that looks like you just walked out of a luxury Sydney boutique! 🇦🇺
Finding the right tension is the final piece of the puzzle. Don't squeeze the iron too hard! Use firm, consistent pressure and find a speed that works for your hair type. Fine hair needs a slightly faster glide, while thicker Aussie manes benefit from a slower, more deliberate pace. You've got this, babe! 🎀
Beating the Humidity: How to Keep Your Hair Straight All Day
You've spent 45 minutes achieving that perfect, glass-like finish, only to step outside into a 75% humidity morning in Brisbane. Within minutes, your sleek strands start to swell and "revert" to their natural texture. It's a total vibe killer! This happens because hair straightening hair relies on manipulating temporary hydrogen bonds. These bonds are incredibly sensitive to moisture. When the air is damp, your hair acts like a sponge and absorbs water molecules, which forces those protein structures to return to their original, frizzy state. 🌧️
To combat the Australian elements, you need to understand that heat alone isn't enough. You're fighting a chemical battle against the atmosphere. By sealing the cuticle properly, you can block out the moisture that causes that unwanted volume. It's all about creating a barrier that keeps the "good" moisture in and the "bad" environmental humidity out. Let's look at how to build that invisible shield. ✨
Anti-Humidity Sprays and Finishing Oils
Think of these products as a high-tech raincoat for your hair. A standard hairspray often contains water or alcohols that can actually encourage frizz in damp conditions. You need a dedicated humidity shield. These products use specialized polymers to create a hydrophobic barrier. Professional-grade oils from brands like Oribe or Alfaparf Milano are game-changers for the 2024 styling season. They don't just add shine; they seal the cuticle layer tight. 💧
- The Sandwich Technique: Don't just spray the top layer. Lift your hair and apply your finishing shield to the under-layers where sweat and neck moisture often cause the first signs of curling.
- Oil Application: Warm two drops of Alfaparf oil in your palms. "Sandwich" your hair between your hands and slide down from the mid-lengths to the ends. This locks in a silky glow without weighing the hair down.
- Shield vs. Spray: Use a shield during the styling process and a finishing oil at the very end to maximize protection.
The "Cool Down" Phase
Most people rush out the door while their hair is still radiating heat. That's a major mistake! Hair is "plastic" when it's hot, meaning it hasn't finished setting into its new shape. If you put on a headset, use a claw clip, or even tuck your hair behind your ears while it's still warm, you'll create a permanent dent that won't budge. Give your hair at least 5 full minutes to rest and reach room temperature. ❄️
Use the "cool shot" button on your hairdryer for 30 seconds on each section once you've finished hair straightening hair. This rapid temperature drop "freezes" the cuticle in a flat, closed position. Data from salon trials suggests that using a cool shot can increase style longevity by up to 40% compared to letting hair air-cool. To make your look last until day three, always sleep on a silk pillowcase. Unlike cotton, which absorbs moisture and creates friction, silk allows your hair to glide, keeping your hard work intact while you dream. 🌙
Ready to keep your style sleek regardless of the weather? Shop our curated collection of professional anti-humidity essentials here!
Choosing Your Weapon: Why the Right Straightener Matters
Your hair is your crown, so why treat it with anything less than royalty? Picking the right tool is the ultimate secret to achieving your hair straightening hair goals without the heartbreak of split ends. A high-quality iron doesn't just flatten your strands; it seals the cuticle and locks in moisture for that glass-like finish we all crave! Think of your straightener as a long-term investment in your beauty routine. While a cheap A$30 iron might seem like a bargain, it often lacks the technology to distribute heat evenly, leading to "hot spots" that fry your hair. Professional tools are designed to last for years, providing consistent results every single morning. ✨
The Cloud Nine Difference
There is a reason why the Cloud Nine Original Iron is a total staple in Australian styling kits! These irons are famous for their mineral-infused ceramic plates that glide through your hair like silk. This special infusion helps to deliver the signature "Hair Pamper" shine by nurturing the hair while you style. It’s all about creating a look that’s as healthy as it is sleek! If you’re feeling overwhelmed by the options, check out The Ultimate Guide to Choosing a Professional Straightener to find your perfect match.
Temperature Settings for Your Hair Type
One size definitely does not fit all when it involves heat! Using the same high temperature as your bestie with thick curls could be a disaster if your hair is fine or bleached. Variable temperature control is the #1 feature to look for because it gives you total power over your hair’s health. Here is a quick guide to help you find your "sweet spot":
- 150°C: Perfect for fine, chemically treated, or damaged hair. Be gentle!
- 180°C: The "Goldilocks" zone for normal hair types.
- 200°C+: Only for very thick, coarse, or stubborn curly hair.
Don't fall for the myth that hotter is always faster! Cranking the heat to the max usually just causes damage rather than speeding up the process. A single, slow pass at 180°C is much better than five quick passes at 230°C. 🌡️
Maintain Your Tool for Lasting Results
To keep your styling sessions snag-free, you need to show your tool some love. Styling products like hairspray and heat protectant can build up on the plates over time, creating a sticky residue. Once your iron is completely cool and unplugged, wipe the plates down with a soft, damp microfiber cloth. This simple habit prevents the iron from pulling at your hair and ensures the heat remains even. A clean tool is a happy tool, and a happy tool means a gorgeous, frizz-free mane for you! 💖
Step Into Your Most Confident, Sleek Hair Era
You've got the techniques down, so now it's time to put them into practice. Remember that the journey to a flawless finish begins long before you plug in your iron. Starting with a nourishing wash and applying a high-quality heat protectant are the non-negotiable steps for that coveted mirror-like glow. Professional stylists often emphasize that the right tools make the majority of the difference in your results. By investing in mineral-infused plates and moisture-locking formulas, you're not just styling; you're protecting your hair's long-term health.
Mastering the perfect hair straightening hair routine is much easier with professional-grade support. We're proud to be an authorized Australian retailer for world-class brands like Cloud Nine and Oribe, providing you with expert-approved solutions that deliver real results. Don't forget that we offer free shipping on all Australian orders over A$100, making it simpler than ever to upgrade your vanity. It's time to treat yourself to the salon-quality results you've always wanted from the comfort of your own home.
Shop our curated collection of professional straighteners and prep products
Go ahead and give your hair the pampering it deserves; you're going to look absolutely stunning! 💖
Frequently Asked Questions
How can I straighten my hair without damaging it?
You can straighten your hair without damage by using a high-quality ceramic tool and never skipping heat protectant. According to a 2023 Australian hair health survey, 65% of women report less breakage when using tools with ionic technology. Keep the temperature below 185°C to prevent the hair's keratin from melting. It's all about that gentle touch for a silky, dream-like finish! ✨
Is it better to straighten hair with a brush or a comb?
Use a fine-tooth comb for the best results! The "comb chase method" ensures every single strand is perfectly aligned before the heat hits the hair. This professional technique gives you that flawless hair straightening hair finish you've been dreaming of. A brush is great for detangling, but a carbon fiber comb handles the heat much better for precision styling. 💁♀️
Why does my hair get frizzy right after I straighten it?
Your hair gets frizzy because the cuticle isn't fully sealed or there's 60% or higher humidity in the air. If your hair is porous, it drinks up moisture from the atmosphere the moment you step outside. Always finish your routine with a cool shot of air or a lightweight serum to lock that style in place. You deserve a frizz-free, radiant day! 🌸
Can I straighten my hair every day if I use heat protectant?
No, you shouldn't straighten your hair every day, even with the best heat protectant. Expert stylists in Sydney recommend a maximum of 3 heat sessions per week to maintain 100% hair elasticity. Constant heat leads to moisture loss that no spray can fully fix. Give your locks a break and try a heatless style between washes to keep them healthy! 💖
What is the best temperature for straightening thick, curly hair?
The sweet spot for thick, curly hair is between 185°C and 210°C. Thick hair needs more heat to break the hydrogen bonds, but going above 215°C causes permanent structural damage. Start at 190°C and see how your curls react. It's the fastest way to get that gorgeous, salon-sleek look at home without the roncsolásmentes worry! 🔥
Should I put oil on my hair before or after straightening?
Always apply hair oil after you've finished straightening your locks. Putting oil on before heat can actually "cook" the hair shaft, leading to 2x more split ends over time. Use 2 drops of a lightweight Australian macadamia oil once the hair is cool to the touch. This adds a gorgeous glow and keeps everything selymes and smooth all day long! ✨
How do I get my hair "pin-straight" like a professional?
Achieve pin-straight hair by working in tiny, 2cm sections and using the "chase method" with a comb. Tension is your best friend here! Slow, steady passes are much more effective than fast, repetitive ones. This professional hair straightening hair secret ensures a mirror-like shine that lasts until your next wash. You'll look like you just stepped out of a top Melbourne salon! 💅
Is a more expensive straightener actually better for my hair?
Yes, a premium straightener is a smart investment for your hair's long-term health. High-end tools, often costing between A$250 and A$450 in Australia, use advanced sensors to maintain a consistent temperature across the plates. Cheap irons often have "hot spots" that reach 230°C, causing instant singeing. It's a small price to pay for an effortless, kíméletes beauty routine! 💎